How to Do a Pull-Up (for Beginners)
This article originally appeared on Outside
Pull-ups are impressive, which means that for many athletes, they're aspirational. If you can't do one, odds are you'd like to. If you can, maybe you're gunning for the single-arm or weighted variation. Once you're able to do a few pull-ups, it's easy to see how you might build up to more. But if you can't do even one, where do you start?
Most people have what they need to lift their own body weight--the issue is accessing all of the muscles needed for the job. People tend to rely on the upper trapezius and elbow flexors, such as the biceps brachii, which shrug the shoulders and bend the elbows but fall short when it comes to lifting the whole weight of the body. Other critical muscles, like the latissimus dorsi and the infraspinatus, might be dormant or just hard for the brain to activate.
In the image below, you can see the line of strength that connects the rock climber's hand all the way down to his lower back. This system of muscles spans from the flexors of the hand, forearm, and elbow to the back line of the arm, shoulder extensors, external rotators, and latissimus dorsi muscle, as well as into the rest of the core. Activating all this gives us the capability to paddle, climb, and swim for hours--and perform a single pull-up.

The latissimus is a powerful muscle that depresses the clavicle and scapula--the shoulder girdle--and lifts the waist up to the arms, while also pulling the upper arm bones toward the trunk and into shoulder extension and adduction (see the illustration below). This is the most important muscle to focus on when learning to do a pull-up. You can identify your lat by feeling with your fingertips at the back of your armpit and side ribs; squeeze your arm down like you're trying to press juice out of a grapefruit in your armpit, and you should feel a bulk of muscle tissue contract that you can grab with your whole hand. You can increase the contraction by simultaneously lifting the waist on the same side up toward the armpit.
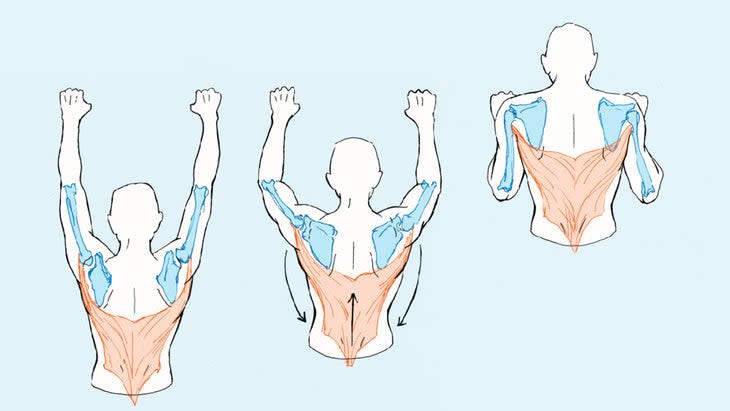
The moves below are designed to safely increase in difficulty. As you develop strength, you can use the entry exercises as warm-ups for more difficult ones. This process will likely take weeks to months, depending on your level of entry. These exercises aren't just for show, either: pull-ups, and the moves that help you build up to them, can help improve your strength-to-weight ratio, tone your upper body, and serve as cross-training for many different sports and activities.
The Moves
Inverted Rows with Suspension Straps


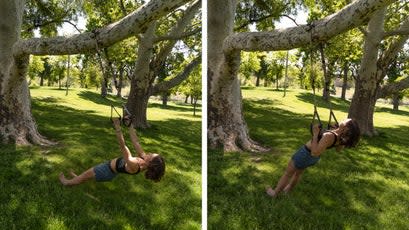
What they do: This is an excellent entry-level pull exercise that engages the upper back muscles, specifically the latissimus dorsi.
How to do them: Loop suspension straps over a branch, bar, or other secure, elevated structure. Begin standing, with the grips in both hands and your arms straight in front of you, and walk your feet forward until you feel challenged by the body-weight load. The more you walk your feet forward, the more difficult the move will be. Pull yourself up and into an inverted plank position with a rowing motion, bending your arms and pulling your elbows behind you. Your shoulder blades will start wide on your rib cage, then slide toward the spine as you reach the top of the movement. Focus on engaging your lats, core, and the backs of your shoulders, instead of relying on the upper trapezius or elbow flexors. Reverse this movement as you slowly lower back to the starting position. Make sure you can hold that starting position with straight arms and maintain good form throughout the entire range of motion. Progress to the next exercise after you build confidence and strength with this move.
Volume: One to three sets of five to eight repetitions, holding for a few seconds at each end range. Rest one to three minutes between sets. Perform this exercise two to three times per week.
Hip Hinge Pull-Ups with Suspension Straps
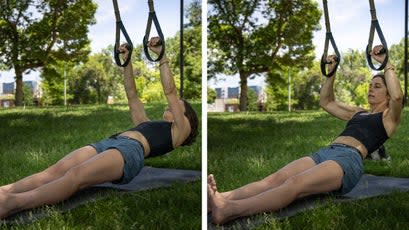
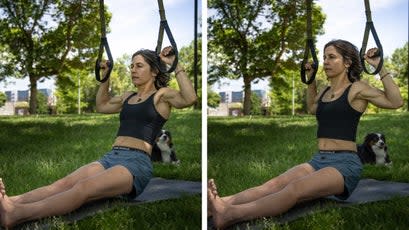

What they do: This move brings you through the full range of motion of a pull-up--but with the assistance of your heels on the ground. It engages the latissimus and triceps muscles by engaging your shoulders in a wide-arm T-shape position. You should feel the lat work to pick your waist up and pull your elbows down toward your trunk, especially at the top of the move.
How to do them: Begin by adjusting the strap handles to be at about hip height when standing. Then sit down, with your legs straight out in front of you, and start with straight arms gripping the handles in an inverted row position. You can keep your hips on the ground here if you need the assistance. Pull up into a seated hip-hinge position, widen your elbows, and pull them straight down toward your sides. Your front and back core should be firing to help lift you into this 90-degree hip-fold position. At the top of the position, you should feel your lats activate to lift your bottom up from the ground, like you are trying to go chin over bar at the top of a pull-up. Hold for one second, then slowly unfold back into the starting position of the inverted row. Your heels and legs should stay in the same place throughout the move. You will probably have to wiggle around to find the right place to begin and end relative to where your straps are anchored.
Volume: Perform one to three sets of five to eight repetitions, holding for a few seconds at each end range. Rest one to three minutes between sets. Perform this exercise two to three times per week.
Box Assisted Pull-Ups


What they do: This move helps you find all of the necessary muscle activation for a pull-up without too heavy of a load. Take what you've learned from exercises one and two and apply your strength here.
How to do them: Place a stable box beneath a bar, and let your legs hang limp and heavy on the box as you hold onto the bar. Do not push with your feet. Try hanging here at the starting position. Activate your lats and shoulder muscles to pull your shoulders down, away from your ears. Then imagine that you're trying to squeeze a grapefruit tucked into your armpits. This will draw your upper arm bones toward your waist and send your trunk up toward the bar. Keep pulling until you sneak your chin over the bar. Congrats! You just did a reduced body-weight pull-up. Lower slowly back to the starting position.
Volume: One to three sets of three to eight repetitions, holding for a few seconds at each end range. Rest one to three minutes between sets. Perform this exercise two to three times per week.
Band Assisted Pull-ups


What they do: This is another way to feel the work of a full pull-up without lifting your entire body weight, using a large resistance band to reduce the load.
How to do them: Hitch a large resistance band to a bar. Pull the loop down and step one foot into the loop while you set up your starting position. Keep standing in the loop as you get your hands positioned on the bar. Try hanging here at the starting position. Activate your lat, shoulder extensors, and core to pull your shoulders down away from your ears. Then draw your upper arm bones toward your waist, and lift your trunk until you sneak your chin over the bar. Choose the amount of assistance you require from the elastic band by determining the appropriate strength of band (10 pounds, 25 pounds, etc); you may need quite a bit of assistance from the band to start in some cases. Reduce the strength of the band over time.
Volume: One to three sets of three to eight repetitions, holding for a few seconds at each end range. Rest one to three minutes between sets. Perform this exercise two to three times per week.
Isometric Pull-ups

What they do: After the entry-level exercises have been mastered, isometric exercises help you get the feel of holding your body weight in various pull-up positions without the more difficult tasks of lifting and lowering.
How to do them: Position a box under a bar, stand on the box, and grab the bar. Create a 90-degree elbow and shoulder position, and hold firm in this shape. You are about to lift your feet off of the box. Hold tight and squeeze your core, lat, and shoulder muscles that you've strengthened and activated in exercises one through four. Once you have held this for the allotted amount of time, back onto the box. Do not lower or lift into the position. Rest. The 90-degree shape is a great angle to train, but you can also perform isometric hangs at higher and lower angles of the pull-up motion. Choose to perform the holds in angles where you feel you need the work. Sometimes this is at the start of the pull-up, when your elbows are extended to around 160 degrees.
Volume: Hold for three to eight seconds. Perform one to five sets of one hold. Rest one to three minutes between sets. Perform this exercise two to three times per week.
Eccentric Pull-ups
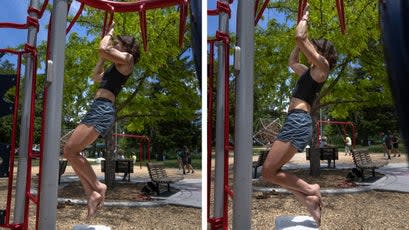

What they do: It's easier to slowly lower out of a pull-up than to slowly lift into one. Lowering uses eccentric strength, which utilizes a protein in our muscles called titin that helps us resist lengthening, thereby allowing us to produce more force. Be sure to warm up before attempting this move.
How to do them: Position a box under a bar that is tall enough to allow you to grab it and start at the top of a pull-up without having to lift yourself into position. Hold the starting position, and lift your feet away from the box. You should be able to stay here for a few seconds, then slowly lower until your elbows are nearly straight. Step onto the box or touch down on the floor. That's one repetition. Rest, then restart at the top.
Volume: Two to five sets of one repetition. Rest one to three minutes between sets. Perform this exercise one to two times per week. As you get stronger, you can perform several reps back-to-back, performing one to three sets of three to five repetitions as your strength improves.
Body Weight Pull-up
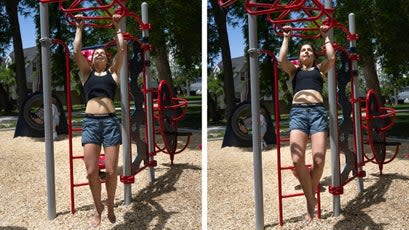
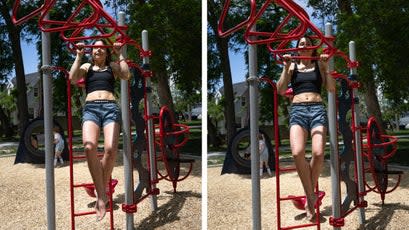

What they do: Congratulations! If you have arrived here, that means you put in the work to get to know your whole pull system and you've increased your strength to match your body weight for a full pull-up. A body weight pull-up will help strengthen the entire chain of muscles that you have been training throughout the program, and it's a great cross-training tool for any movement or sport that involves pulling or overhead lifting.
How to do them: Be sure you're fully warmed up before attempting this move. Stand under a bar and begin by hanging with your elbows nearly straight but your shoulders firmly drawn down away from your ears. You should feel your whole "pull" line activate from your fists to your core. Contract the system together, leading the way with the lats working to draw the upper arm bones toward your trunk. Pull up the front of your core. Keep everything working to the very top and as you lower.
Volume: Two to five sets of one repetition. Rest one to three minutes between sets. Perform this exercise one to two times per week. As you get stronger, you can perform several reps back-to-back, doing one to three sets of three to ten repetitions as your strength improves.
Esther Smith, a doctor of physical therapy certified in mechanical diagnosis and therapy, has specialized in treating athletes (specifically rock climbers) for the past decade. She is a storyteller, mountain athlete, and high-performance coach for the Samsara Experience. You can find Smith's written and video resources cataloged at Grassroots Self Treatment and learn more about her physical-therapy practice at Grassroots Physical Therapy.
For exclusive access to all of our fitness, gear, adventure, and travel stories, plus discounts on trips, events, and gear, sign up for Outside+ today.
